|
CONTENTS:
TK560 Main
Communicators
Phasers
Tricorders
Helmets
Blasters
Stormtrooper Armor
Lightsabers
Astro-Mech Droids
How-to Guides
Cylon
Centurion
Viper Pilot Helmet
M41-a Pulse Rifle
Motion Tracker
B5 PPG
Retro
Box Designs
Repair/Restoration
Replica Parts
40th Anniversary
Replica
Weapons/Gear
Reenactment Units
ME262 Project
Civilian
Marksmanship Program |
M1
Garand Rifle
M1903 Springfield
Rifle
M1 Carbine
Discussion
Board
Lauren Photo Albums
Egner II
Design
Please
note, that the images, logos, and respected artworks, are property of
the original copyright owners. TK560 has no affiliation with any of the
intellectural property owners. This is a fan site dealing with movie and
television replica props, original GIjOE action figures, World War II
memorbilla, and marksmanship/ firearms interests. Most of the images used
on this site are photgraphed by the site owners. Official logos are used
to identify specific products/ manufacturers.
|
These
instructions are from John H. and worked great! Many thanks!
Vac-u-form
Table Project: Thurston James' Design |
| Supplies:
10
gage wire: It will be called "Romex 10-2 G" in
the stores most likely. It means 10 gage, 2 conductors with Ground
[I bought a 25 foot lenght]
Dimmer switch: Preferably one with a distinct on/off
so you can be sure your oven's off. If you can find one That lights
up when it's turned on, that would be perfect.
[I used a gray 20amp light switch]
Electrical box and cover: Preferably metal and
wide enough for one light switch (get the deepest one you can find
so you have some room to work). Some boxes have a metal piece that
can tighten down on the wires coming in so the connections don't
get pulled on. Get this kind if you can. Also buy a cover for it,
which will probably be plastic. You want one that fits your dimmer
switch.
"Wire nuts": They come in different sizes,
so realize that you need two: one to join (4) 10 gage wires and
one for (3) 10 gage wires. The box will list how many of each gage
of wire you can join together with it. (#14, 2-5 #12, 2-3 #10, 2
or something like that). You may need to buy more than one kind,
but probably not. You can usually buy small packages (10 or 20)
of these instead of the big boxes for electricians.
Electricians tape.
3 Prong plug: With nothing attached to it if you
can. Get one rated at 30 amps. If you can't find one, buy a heavy
duty extention cord and cut the end off that you don't need.
[I used a 3 prong heavy duty 15amp plug]
Construction:
here's
what you do:
- Cut
off 3 pieces of wire, 2-3 feet long. Then remove the outer covering.
Inside you'll find a black wire (HOT), a white wire (NEUTRAL),
and either a green or a bare wire (GROUND).
- Strip
off the last 1/2 inch of insulation on the 3 black wires with
either a knife (just cut all the way around and slide the insulation
off, or with a wire cutter being careful to only cut the insulation,
not the wire)
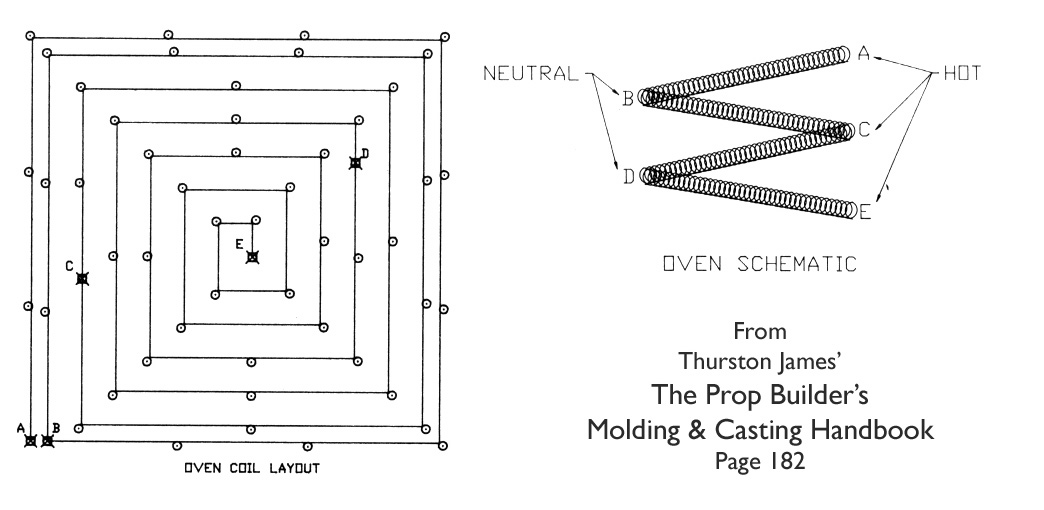
- Connect
BLACK wires to the A,C,E terminals from the diagram.
Wrap the bare wire around the bolt clockwise, then tighten the
nut down onto it. Then cover with electricians tape so no metal
is exposed.
- Connect
WHITE wires to the B,D terminals the same way.
- Mount
the box to your oven with screws. Put it in a place that's convenient
for your switch.
- Connect
the ground wire to something metal in the oven (not the coils).
- Thread
all the wires into your box through a side hole. Tighten the metal
piece down on the wires, and trim off the excess wire, leaving
4 or so inches hanging out of the box.
- Strip
the ends of your wires.
- Cut
a 4 inch black wire, strip the ends, and make a bundle with the
ends of your 4 black wires so the ends point in the same direction.
Twist the ends together as best you can since they're thick. Twist
the ends clockwise. Put a wire nut on the end and screw it on
clockwise with your hand until it won't go any further. Make sure
all wires are secure.
- Do
the same with your 2 white wires, but instead of using a short
wire, connect the 2 to the white wire from your power cord.
- Connect
the short black wire to your dimmer switch using the screw terminals
on the side.
- Connect
the black wire from your plug to one side of your dimmer switch.
- Connect
the ground wires from the oven and the power cord to the metal
box.
- Stuff
everything into the box. Screw the switch to the box, and screw
on the cover.
Here
is a diagram that might help.
|
| This
project was last update on March 9, 2006 |
|
